Una vita migliore inizia con i test
Un programmatore che non scrive casi di test automatizzati non è un buon ingegnere di test. Incoraggiamo tutti i progetti a stabilire casi di test automatizzati completi fin dall'inizio. Man mano che il progetto si sviluppa, l’investimento iniziale verrà restituito centinaia di volte.
Continuiamo l'esempio della sezione precedente e vediamo come scrivere un test case utilizzando fibjs.
1
2
3
4
5
6
7
8
9
10
11
12
13
14
15
16
17
18
19
20
21const http = require('http');
const path = require('path');

var hello_server = {
    '/:name(fibjs.*)': (req, name) => {
        req.response.write('hello, ' + name + '. I love you.');
    },
    '/:name': (req, name) => {
        req.response.write('hello, ' + name);
    }
};

var root_server = {
    '/hello': hello_server,
    '/bonjour': hello_server,
    '*': http.fileHandler(path.join(__dirname, 'web'))
};

var svr = new http.Server(8080, root_server);

svr.start();
un frame di prova vuoto
Cominciamo con un framework di test di base:
1
2
3
4
5
6
7
8
9
10var test = require('test');
test.setup();

describe('hello, test', () => {
    it('a empty test', () => {

    });
});

test.run();
Dopo averlo salvato come test.jsed eseguito sulla riga di comando fibjs test.js, vedrai il seguente output e verrà scritto un framework di test di base.
1
2
3
4  hello, test
    √ a empty test

  √ 1 tests completed (0ms)
Inizia a testare il server
Poiché dobbiamo testare il server http, dobbiamo prima avviare il server. Il test case effettuerà una richiesta al server e quindi testerà il risultato della richiesta per determinare se il server soddisfa i requisiti:
1
2
3
4
5
6
7
8
9
10
11
12
13
14var test = require('test');
test.setup();

var http = require('http');

describe('hello, test', () => {
    it('hello, fibjs', () => {
        var r = http.get('http://127.0.0.1:8080/hello/fibjs');
        assert.equal(r.statusCode, 200);
        assert.equal(r.data.toString(), 'hello, fibjs. I love you.');
    });
});

test.run();
In questo codice determiniamo se la logica del server è normale verificando se il risultato di http.get è quello che ci aspettiamo. Seguendo questo esempio, possiamo completare rapidamente una serie di test e allo stesso tempo ottimizzare il codice:
1
2
3
4
5
6
7
8
9
10
11
12
13
14
15
16
17
18
19
20
21
22
23
24
25
26
27
28
29
30var test = require('test');
test.setup();

var http = require('http');

function test_get(url, rep) {
    var r = http.get('http://127.0.0.1:8080' + url);
    assert.equal(r.statusCode, 200);
    assert.equal(r.data.toString(), rep);
}

describe('hello, test', () => {
    it('hello, fibjs', () => {
        test_get('/hello/fibjs', 'hello, fibjs. I love you.');
    });

    it('hello, fibjs*', () => {
        test_get('/hello/fibjs-great', 'hello, fibjs-great. I love you.');
    });

    it('hello, JavaScript', () => {
        test_get('/hello/JavaScript', 'hello, JavaScript');
    });

    it('hello, v8', () => {
        test_get('/hello/v8', 'hello, v8');
    });
});

test.run();
Utilizzare la gestione dei gruppi di casi
Successivamente aggiungiamo il test di bonjour. Sebbene bonjour e hello siano lo stesso insieme di servizi, poiché il percorso è cambiato, dobbiamo anche verificare la correttezza del servizio. Questa volta, per gestire meglio i casi d'uso, abbiamo eseguito i casi di test Raggruppando, allo stesso tempo, poiché i contenuti del test di hello e bonjour sono gli stessi, abbiamo ottimizzato nuovamente il codice e utilizzato lo stesso set di codice per testare i due set di servizi:
1
2
3
4
5
6
7
8
9
10
11
12
13
14
15
16
17
18
19
20
21
22
23
24
25
26
27
28
29
30
31
32
33
34
35
36
37var test = require('test');
test.setup();

var http = require('http');

function test_get(url, rep) {
    var r = http.get('http://127.0.0.1:8080' + url);
    assert.equal(r.statusCode, 200);
    assert.equal(r.data.toString(), rep);
}

describe('hello, test', () => {
    function test_hello(hello) {
        describe(hello + ' test', () => {
            it('fibjs', () => {
                test_get('/' + hello + '/fibjs', 'hello, fibjs. I love you.');
            });

            it('fibjs*', () => {
                test_get('/' + hello + '/fibjs-great', 'hello, fibjs-great. I love you.');
            });

            it('JavaScript', () => {
                test_get('/' + hello + '/JavaScript', 'hello, JavaScript');
            });

            it('v8', () => {
                test_get('/' + hello + '/v8', 'hello, v8');
            });
        });
    }

    test_hello('hello');
    test_hello('bonjour');
});

test.run();
Raggruppando i casi d'uso, possiamo visualizzare i risultati del test in modo più chiaro e possiamo anche saltare e testare facilmente un gruppo di casi d'uso separatamente per accelerare lo sviluppo e il test. Ecco i risultati di questo ciclo di test:
1
2
3
4
5
6
7
8
9
10
11
12
13  hello, test
    hello test
      √ fibjs
      √ fibjs*
      √ JavaScript
      √ v8
    bonjour test
      √ fibjs
      √ fibjs*
      √ JavaScript
      √ v8

  √ 8 tests completed (3ms)
Secondo la progettazione del nostro server, abbiamo anche una serie di servizi di file statici. Seguendo l'esempio sopra, credo che tu possa scrivere rapidamente questa parte dei casi di test.
Prova con un clic
Dopo l'introduzione di cui sopra, possiamo stabilire rapidamente i casi di test. Ma per poter utilizzare questo script di test, è necessario prima avviare il server, il che è molto scomodo. Speriamo che l'esecuzione test.jspossa completare direttamente il test. Possiamo raggiungere questo obiettivo con il seguente codice:
1
2
3
4
5
6
7
8
9
10
11
12
13
14
15
16
17
18
19
20
21
22
23
24
25
26
27
28
29
30
31
32
33
34
35
36
37
38
39
40
41
42
43var test = require('test');
test.setup();

var http = require('http');

var coroutine = require('coroutine');
coroutine.start(() => {
    run('./main.js');
});
coroutine.sleep(100);

function test_get(url, rep) {
    var r = http.get('http://127.0.0.1:8080' + url);
    assert.equal(r.statusCode, 200);
    assert.equal(r.data.toString(), rep);
}

describe('hello, test', () => {
    function test_hello(hello) {
        describe(hello + ' test', () => {
            it('fibjs', () => {
                test_get('/' + hello + '/fibjs', 'hello, fibjs. I love you.');
            });

            it('fibjs*', () => {
                test_get('/' + hello + '/fibjs-great', 'hello, fibjs-great. I love you.');
            });

            it('JavaScript', () => {
                test_get('/' + hello + '/JavaScript', 'hello, JavaScript');
            });

            it('v8', () => {
                test_get('/' + hello + '/v8', 'hello, v8');
            });
        });
    }

    test_hello('hello');
    test_hello('bonjour');
});

process.exit(test.run());
Nelle righe da 6 a 10 di questo codice, aggiungiamo un main.jscodice di avvio e aspettiamo qualche istante prima di iniziare il test.
controllo della copertura del codice
I casi di test validi devono considerare che i casi di test devono coprire ogni ramo dell'azienda per garantire che l'attività venga eseguita correttamente. A questo punto, è possibile utilizzare il controllo della copertura del codice per determinare se il test è completo.
Questo processo è molto semplice, basta aggiungere il parametro --cov durante il test:
1fibjs --cov test
Una volta completato il test, nella directory corrente verrà generato un file di registro fibjs-xxxx.lcov. A questo punto, è necessario analizzare il registro e generare un rapporto:
1fibjs --cov-process fibjs-xxxx.lcov out
Una serie di report di analisi può essere generata nella directory out. Entra nella directory per controllare e puoi vedere la seguente pagina: Puoi
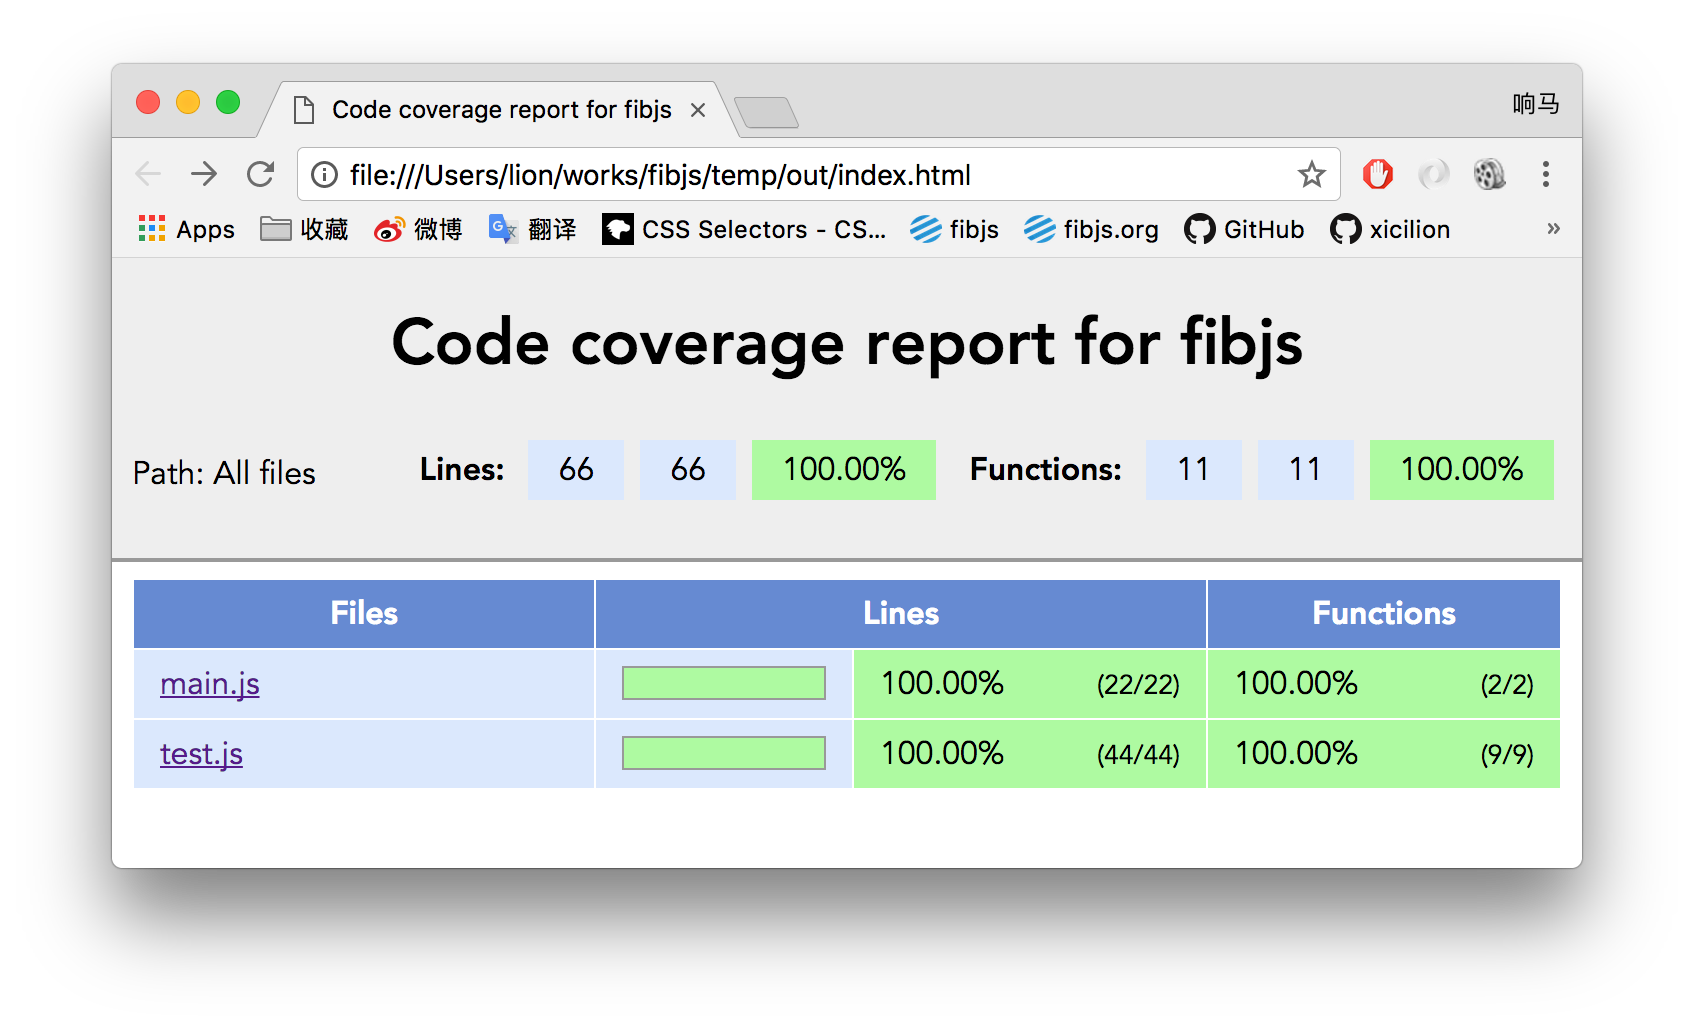 vedere che
 main.jsla copertura del codice ha raggiunto il 100%, il che significa che il test copre completamente la logica aziendale. Fare clic main.jsulteriormente per visualizzare un rapporto più dettagliato.